


How to Make Gravity Bong Using a Proven Easy Method
In the diverse landscape of combustion and inhalation devices, few apparatuses command the same mix of reverence, infamy, and engineering curiosity as the gravity bong. Often colloquially known as the “bucket bong,” “geeb,” or “waterfall,” this device represents a fundamental departure from the mechanics of traditional water pipes. While standard bongs rely on the user’s lung capacity to generate the negative pressure required to draw smoke through a cooling medium, the gravity bong harnesses the immutable laws of physics—specifically fluid dynamics and atmospheric pressure—to facilitate combustion and delivery.This distinction is not merely academic; it results in a consumption experience characterized by unparalleled density, rapid onset, and extreme efficiency, transforming the act of smoking from a respiratory effort into a passive reception of pressurized smoke.
For decades, the gravity bong existed primarily as a staple of Do-It-Yourself (DIY) culture, often constructed from repurposed polyethylene terephthalate (PET) soda bottles and household hardware. The query “how to make gravity bong” has long been a rite of passage for enthusiasts seeking to maximize the potency of their material with minimal financial investment.However, the modern era has seen this concept gentrified and engineered into high-end luxury products. Companies like Stündenglass and GRAV have reimagined the crude bucket bong as a centerpiece of borosilicate glass and kinetic motion, elevating it from a dormitory novelty to a sophisticated lifestyle accessory.
This report serves as an exhaustive guide to the gravity bong ecosystem. It is designed to function as the definitive resource for understanding the device’s operation, the benefits it offers over traditional methods, the sourcing of materials for both commercial and home-built units, and the critical fabrication protocols required to construct one safely. Furthermore, it addresses the imperative health and safety considerations, analyzing the risks of plastic toxicity and respiratory barotrauma to ensure users make informed decisions.Whether one is an engineer appreciating the fluid mechanics or a consumer seeking the most efficient delivery method, this analysis covers every facet of the gravity bong.

Why choose a gravity bong
The decision to utilize a gravity bong over a standard hand pipe, joint, or beaker bong is rarely arbitrary. It is usually driven by specific requirements regarding material conservation, potency, and the physics of inhalation. To understand why a user would choose this method, we must first dissect the unique mechanical principles that govern its operation.
The Physics of Hydraulic Displacement
At its core, the gravity bong operates on the principle of a vacuum created by water displacement. Unlike a traditional bong where the user provides the suction, a gravity bong uses the weight of water to do the work. The device typically consists of two containers: a smaller chamber (often a bottle) holding the combustible material, and a larger reservoir filled with water.
- The Vacuum Phase (Draw): As the user lights the material and slowly lifts the smaller chamber out of the water, the water level inside the chamber drops, attempting to equalize with the reservoir. However, because the top is sealed by the bowl, air cannot enter freely. This creates a vacuum (negative pressure) inside the chamber. To equalize the pressure, air is forcefully drawn through the ignited bowl, filling the expanding void with dense smoke. This process ensures that the flame is pulled deep into the material, resulting in complete combustion.
- The Pressure Phase (Inhalation): Once the chamber is full of smoke, the user removes the bowl and pushes the chamber back down into the water. The water in the reservoir exerts hydrostatic pressure, forcing the smoke upward and out of the mouthpiece. This effectively “injects” the smoke into the user’s lungs, bypassing the need for diaphragmatic effort.
Efficiency and Potency
The primary argument for choosing a gravity bong is efficiency. In open combustion methods like joints or pipes, a significant portion of smoke is lost to the atmosphere as “slipstream” smoke between puffs. The gravity bong captures 100% of the smoke generated during the burn within the sealed chamber. This allows users to achieve a potent physiological effect using a fraction of the material required for other methods. For medical users or those on a strict budget, this conservation of material is a compelling factor.
The Intensity Factor
The experience of using a gravity bong is frequently described as “intense” or “heavy.” This is due to the lack of aeration. In a standard bong, smoke is pulled through the water, breaking into bubbles (percolation) which cools the smoke and filters out particulates. In a gravity bong, the smoke sits on top of the water. While some heavy particulates may settle, there is no active percolation. Consequently, the smoke is hotter and denser. When combined with the pressurized delivery, this results in a rapid onset of effects that can overwhelm even seasoned users, often described as feeling like “taking four bong rips at once”.
Table 1: Mechanical Comparison of Smoking Devices
| Feature | Gravity Bong | Standard Beaker Bong | Hand Pipe |
| Primary Mechanism | Water Displacement / Vacuum | Lung Suction / Percolation | Direct Lung Suction |
| Smoke Temperature | High (No percolation) | Low (Water cooled) | High (Direct path) |
| Draw Resistance | Zero (Pressurized) | Moderate (Drag dependent) | Low to Moderate |
| Material Efficiency | Maximum (100% Capture) | Moderate (Slipstream loss) | Low (Constant burn) |
| Filtration Level | Minimal (Surface contact) | High (Active diffusion) | None |
| User Experience | Intense, Rapid Onset | Smooth, Gradual Onset | Harsh, Manual Control |
Benefits of a Gravity Bong
While the intensity of a gravity bong can be daunting for novices, the device offers several distinct advantages that sustain its popularity. Beyond the raw physics, the benefits extend to economic, social, and accessibility factors.
- Unmatched Efficiency and Conservation:
The most cited benefit is the ability to stretch a limited supply of material. Because the vacuum mechanism ensures complete combustion and total smoke capture, a small “pinch” of herb in a gravity bong can yield a smoke volume equivalent to a large bowl in a standard pipe. This makes it the most economically efficient method of consumption available, ideal for users seeking to minimize waste. - Zero-Effort Inhalation:
For individuals with reduced lung capacity or respiratory issues that make the strong suction of a traditional bong difficult, the gravity bong offers a functional alternative. The hydraulic pressure forces the smoke out, meaning the user does not need to “pull” against the resistance of water or percolators. They simply breathe in the output, making the process mechanically easier, albeit harsher on the throat. - Potency for High-Tolerance Users:
Long-term consumers often develop a tolerance that makes standard methods less effective. The gravity bong overcomes this “plateau” by delivering a massive dose of active compounds (cannabinoids/THC) in a single, concentrated inhalation. The rapid absorption in the alveoli, combined with the slight hypoxia from the dense smoke, creates a breakthrough effect that other devices cannot replicate. - Social and Theatrical Appeal:
Large-scale gravity bongs, particularly modern glass units like the Stündenglass or massive DIY builds, serve as social centerpieces. The visual spectacle of the water draining and the chamber filling with thick, creamy smoke adds a theatrical element to the session. It transforms consumption into a shared activity or “party trick,” enhancing the communal aspect of the experience. - Versatility of Construction:
The gravity bong is uniquely agnostic to materials. While high-end glass is available, the device can be constructed in an emergency from universally available items—a plastic bottle and a bucket of water. This “MacGyver” aspect means that knowledge of how to make gravity bong effectively creates a smoking device anywhere in the world, provided one has access to basic recyclables.
Where to Buy Gravity Bongs/Materials
The market for gravity bongs has bifurcated into two distinct streams: the high-end commercial market for those seeking safety and luxury, and the raw materials market for the DIY enthusiast.
Commercial Gravity Bongs
The commercial sector has expanded significantly, moving away from novelty items toward durable, medical-grade equipment.
- The Luxury Segment: Stündenglass Gravity Infuser
The Stündenglass represents the zenith of gravity bong engineering. Developed by former Apple employees (according to industry lore) and popularized by celebrities like Seth Rogen and Wiz Khalifa, this device uses a patented 360-degree rotating dual-chamber system.
- Mechanism: Kinetic energy utilizes gravity to move water between two globes. As the unit rotates, water leaves the upper globe, pulling smoke in. Another rotation pushes the smoke out via a contactless mouthpiece.
- Materials: Anodized aircraft-grade aluminum and borosilicate glass.
- Price: $500 – $600 USD.
- Availability: Online retailers like Stundenglass.com, 420 Science, and luxury smoke shops.
- The Mid-Range Segment: GRAV Gravitron
GRAV (formerly Grav Labs) legitimized the bucket bong with the Gravitron. It is essentially a glass version of the classic DIY soda bottle setup, eliminating the health risks of plastic.
- Mechanism: Standard manual lift-and-plunge.
- Materials: High-quality borosilicate glass with a silicone grommet at the base to prevent breakage during the plunge.
- Price: $80 – $150 USD depending on size (Medium vs. Large).
- Availability: Widely available at online headshops like Smoke Cartel, Grasscity, and GRAV’s own site.
- The Budget/Travel Segment: Silicone Hybrids
Brands like Pulsar offer silicone gravity bongs. These are unbreakable and collapsible, making them ideal for camping or travel.
- Price: $75 – $100 USD
- Availability: General online smoke shops.
Sourcing Materials for DIY Construction
For the vast majority of users, how to make gravity bong implies a home build. The necessary materials are ubiquitous, but safety is paramount.
- The Chamber:
- Standard: 2-Liter soda bottle (PET plastic).
- Upgrade: Glass liquor bottle (requires drilling).
- Source: Grocery stores or recycling bins.
- The Reservoir:
- Standard: A bucket, pitcher, or the bottom half of a larger jug (e.g., a 3-liter bottle).
- Source: Hardware stores (Home Depot/Lowe’s) for buckets.
- The Bowl (Crucial for Safety):
- Improvised: A stainless steel socket wrench head (12mm – 15mm is ideal). Warning: Avoid galvanized steel or “black” impact sockets, which may be coated in zinc or oils that release toxins when heated.
- Professional Upgrade: A 14mm or 18mm glass downstem and bowl. This is the single best upgrade for a DIY setup, ensuring the flame only touches glass.
- Source: Hardware stores for sockets; Headshops for glass bowls.
Table 2: DIY vs. Commercial Cost Analysis
| Component | DIY (Plastic/Socket) | DIY (Glass Drill) | Commercial (GRAV) | Commercial (Stündenglass) |
| Chamber | Free (Recycled Bottle) | $15 (Bottle + Bit) | Included | Included |
| Reservoir | $5 (Bucket) | $5 (Bucket) | Included | Included |
| Bowl | $3 (Socket) | $15 (Glass Bowl) | Included | Included |
| Labor | 10 Minutes | 1 Hour | None | None |
| Total Cost | ~$8.00 | ~$35.00 | ~$100.00 | ~$600.00 |
Detailed Fabrication Protocols: How to Make a Gravity Bong
This section provides expert-level instructions for constructing the two primary variants of the gravity bong: the Bucket and the Waterfall. Additionally, it details the advanced method of drilling glass for a permanent, safer device.
Method 1: The Classic Bucket Bong
This is the most common interpretation of how to make gravity bong. It utilizes a submersion mechanism.
Required Materials:
- 1x Plastic Bottle (16.9oz to 2-Liter).
- 1x Larger Container (Bucket or cut 3-Liter bottle).
- 1x Bowl (Socket or Glass Slide).
- Tools: Scissors/Knife, Lighter/Drill.
Step-by-Step Procedure:
- Prepare the Reservoir: Fill your bucket with water. If using a secondary plastic bottle as the reservoir, cut the top (neck) off to create a wide cylinder. The water level should be deep enough to submerge the main bottle up to its neck.
- Prepare the Chamber: Take the smaller bottle and cut off the bottom. Pro Tip: Do not cut the entire bottom off. Instead, cut a jagged pattern or leave a small ring of plastic at the base. This prevents the bottle from creating a suction seal against the bottom of the bucket if you push it down too hard.
- Construct the Cap (The Bowl):
- Remove the plastic cap.
- Using a drill bit or a heated metal poker, create a hole in the absolute center of the cap. The hole should be slightly smaller than the stem of your socket or glass bowl.
- Press the socket/bowl into the hole. The plastic should stretch slightly, creating an airtight friction seal. If it is loose, use a food-grade high-heat silicone o-ring. Do not use superglue or tape, as these will off-gas toxic fumes near the heat source.
- Operation:
- Submerge the chamber (without the cap) into the water until only the neck is above the surface.
- Screw the cap (loaded with herb) onto the chamber.
- Light the herb while slowly lifting the bottle. Watch the chamber fill with milk-white smoke.
- Stop lifting before the bottom of the bottle leaves the water (breaking the seal).
- Unscrew the cap, place your mouth over the opening, and push the bottle down to inhale.
Method 2: The Waterfall Bong
The waterfall variation relies on drainage rather than submersion. It is more portable as it does not require a bucket.
Required Materials:
- 1x Large Plastic Bottle (2-Liter or Gallon Jug).
- 1x Bowl (Socket or Glass Slide).
- Tools: Knife/Drill.
Step-by-Step Procedure:
- Prepare the Cap: Follow the same cap construction steps as Method 1.
- Create the Drain: Near the very bottom of the bottle, cut or drill a small hole (approx. 5mm to 8mm). It must be small enough to be easily plugged with a single finger.
- Operation:
- Plug the drain hole with your finger.
- Fill the bottle with water to the top.
- Screw on the loaded cap.
- Hold a lighter to the bowl and release your finger from the drain hole.
- As the water drains into a sink or on the ground, the vacuum pulls smoke into the bottle.
- Once drained, unscrew the cap and inhale the smoke.
Advanced Method: The Glass Gravity Bong (Drilling Protocol)
For users concerned about plastic toxicity, constructing a gravity bong from a glass liquor bottle (like a vodka or whiskey bottle) is the gold standard of DIY.
Required Materials:
- 1x Glass Bottle with a flat bottom (750ml or 1L).
- 1x Diamond Core Drill Bit (size 1/2 inch or similar).
- 1x Power Drill.
- Water source.
- Safety Goggles and Mask (Glass dust is dangerous).
Step-by-Step Procedure:
- Safety First: Wear your mask and goggles. Inhaling silica dust causes long-term lung damage.
- Lubrication: Drilling glass requires constant water lubrication to prevent the glass from shattering due to thermal shock and to trap dust. You can place the bottle in a shallow pan of water or have a helper pour a steady stream over the drill site.
- Drilling Technique:
- Start the drill at a 45-degree angle to the glass surface to create a “bite” or groove. If you start at 90 degrees, the bit will wander and scratch the glass.
- Once the groove is established, slowly move the drill to a 90-degree (vertical) position.
- Apply very light pressure. Let the diamond grit grind away the glass; do not force it. High speed (RPM) is generally better than high pressure.
- Drill a hole near the bottom side of the bottle (for a waterfall) or through the center of the bottom (for a bucket, though this is harder as the bottom is thickest).
- Finishing: Sand the edges of the hole with wet sandpaper to remove sharp shards. Clean the bottle thoroughly to remove any glass dust before use.
Tips to select the right gravity bong
Navigating the choice between building and buying, or selecting materials, requires balancing safety, budget, and intended use.
- Prioritize Glass Over Plastic:
Whenever possible, choose glass. Even food-grade PET plastic degrades over time. The repeated heating and cooling cycles, combined with the caustic nature of smoke resin, can cause plastics to leach chemicals. A glass gravity bong (whether homemade or bought) is infinitely reusable, easier to clean with isopropyl alcohol, and safer for your endocrine system. - Check the Bowl Fit:
If buying a commercial unit or building one, ensure the bowl connection is standard (usually 14mm or 18mm). This allows you to replace the bowl if it breaks or upgrade to a bowl with a built-in screen or ash catcher. Many cheap gravity bongs come with proprietary bowls that cannot be replaced, rendering the device useless if lost.22 - Consider Water Volume and Staleness:
Bigger is not always better. A 5-gallon water jug gravity bong might sound impressive, but smoke creates stale, acrid flavors (due to oxidation) within seconds. If the chamber is too large to clear in a single hit, the remaining smoke will taste foul. Select a size (typically 750ml to 1L) that matches your lung capacity for a fresh hit every time.13 - Look for Ease of Cleaning:
Gravity bongs get dirty faster than any other piece because there is no water filtration to trap ash before it enters the chamber. The walls of the bottle will become coated in sticky yellow resin after just a few uses. Ensure your device has wide openings or removable parts that allow for scrubbing. Complicated percolators in gravity bongs (like in some knock-off brands) are often impossible to clean fully. - Stability is Key:
The act of plunging a gravity bong requires force. If the base reservoir is light or narrow, it is easy to tip the entire unit over, spilling dirty bong water everywhere. If making a DIY version, choose a wide, heavy bucket. If buying commercial, look for a wide, weighted base.29
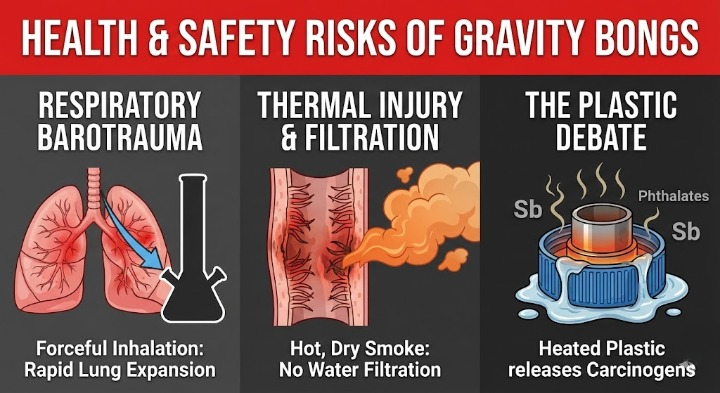
Health and Safety Considerations
No report on how to make gravity bong would be complete without a candid assessment of the risks. The device’s efficiency comes at a physiological cost.
Respiratory Barotrauma
The defining feature of the gravity bong—pressurized injection—is also its primary risk factor. The smoke is forced into the lungs, expanding them rapidly. This can cause barotrauma (pressure injury) to the delicate alveolar sacs. A documented medical case study highlighted a 19-year-old male who suffered alveolar hemorrhage and hemoptysis (coughing blood) attributed to the forceful inhalation from a plastic gravity bong. Users should avoid aggressively “pushing” the bottle down; instead, let gravity lower the bottle gently while inhaling at a natural pace.
Thermal Injury and Filtration
Unlike standard bongs, gravity bongs do not filter smoke through water. The smoke is hot and dry. Chronic exposure to high-temperature smoke can scorch the cilia in the trachea, leading to chronic bronchitis. Furthermore, without water filtration, a higher percentage of tar and particulates reaches the lungs compared to a beaker bong or vaporizer.
The Plastic Debate
Using plastic bottles is the hallmark of the gravity bong, but it carries significant risks. Even if the flame does not touch the plastic, the metal socket can heat up enough to melt the surrounding plastic cap, releasing fumes containing antimony and phthalates. These are known carcinogens and endocrine disruptors. If you must use plastic, replace the bottle and cap frequently—do not use the same “geeb” for months on end.
Conclusion
The gravity bong remains a polarizing yet enduring fixture in the world of cannabis consumption. It is a device of extremes: extreme efficiency, extreme potency, and extreme simplicity. From its origins as a resourceful DIY solution using soda bottles and sockets to its current status as a luxury item engineered by Stündenglass, the gravity bong has proven its staying power.
Understanding how to make gravity bong is about more than just cutting plastic; it is about understanding fluid dynamics and pressure differentials. While the DIY route offers immediate accessibility, the shift towards glass—both in home builds and commercial products—signals a maturing user base that prioritizes safety alongside potency.
For the consumer, the gravity bong represents a tradeoff: the sacrifice of smoothness and cooling for the benefit of raw intensity and material conservation. By following the fabrication protocols outlined in this report and adhering to the safety guidelines regarding materials, users can navigate this tradeoff effectively, ensuring a powerful experience that minimizes unnecessary risks to health and safety.


